Introduction:
Cabling without a cable needle is not a necessary skill to learn; many knitters happily go their entire knitting lives using a cable needle to cable with no regrets. However, if you find that trying to juggle a third needle is fraught with frustration and angst, then perhaps this skill is for you. I find it to be slightly fiddly, but far less so than using a slippery cable needle - not to mention trying to keep track of the little things! I can't tell you how many cable needles I've bought and then promptly lost.What we're doing here is rearranging the stitches on the left needle into their final, post cabled, order. In this case we're working on a 2 x 2 right cross knit cable, so the total number of stitches for the cable we're working is 4. The last 2 stitches on the left needle will cross over the first 2 stitches. Once the stitches are rearranged correctly on the left needle you work the stitches on the left needle from right to left according to the type of cable it is in the pattern.
Photo Tutorial:
Step 1:
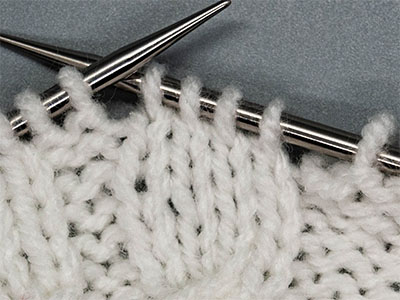
With yarn held to the back of the fabric slip the next four stitches as if to purl from the left needle to the right needle.
Step 2:
Take the left needle and insert it through the back leg of stitches 3 and 4 on the right needle (reading the four stitches moved to the right needle from left to right with the first stitch that was moved in step number one to the right needle being stitch number 1). Leave all four stitches on both needles.
Step 3:
Pull the right needle out of the four stitches that were moved to the right needle in step one. Reading those four stitches from left to right again, as in step two, stitches 1 and 2 have been dropped, and stitches 3 and 4 have been picked up by the left needle in step number two.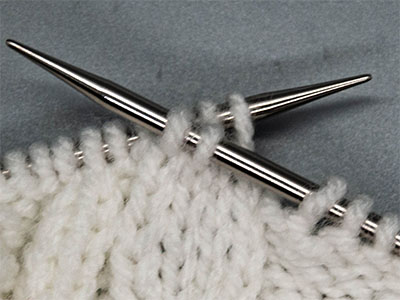
Step 4:
With the right needle carefully pick up dropped stitches 1 and 2. This is the trickiest part of the whole technique as sometimes these dropped stitches will unravel. If this happens take a small crochet hook or the tip of another needle and pull the bar of the unraveled stitch through the loop. A tutorial on repairing unraveled stitches is coming.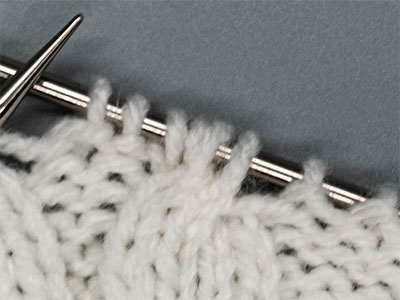
Step 5:
Pull the right needle holding stitches 1 and 2 across the front of the fabric and with the yarn held to the back of the fabric, slip stitches 1 and 2 to the left needle as if to purl. Now stitches 1-4 are on the left needle with stitches 3 and 4 being "behind" stitches 1 and 2 with stitches 1 and 2 crossing over the front of the fabric as is desired for the right leaning 2x2 cable.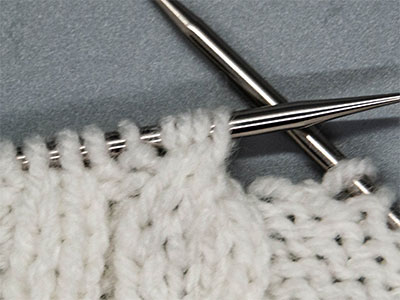
Step 6:
Work the next four stitches on the left needle according to the cable pattern. Typically the first two stitches are knitted, with the second two being either knitted or purled. In this example all four stitches are knitted, so in this case you would simply knit the next four stitches and then continue on in pattern with the fifth sitch on the left needle. In this case, a purl stitch.